Create a Sculpted Look With These Makeup Cheek Contouring Tips
Contouring your cheeks can be a great way to add definition and shape to your face – but it can also be intimidating! Knowing the basics of how and where to apply blushes, bronzers, and highlights can help you master this makeup technique. In this blog post, we will break down everything you need to know about achieving a sculpted look with cheek contouring tips that will make it easy for anyone—even those with little or no experience in makeup application! From understanding which products work best for various skin tones and facial features to learning the correct steps for blending seamlessly—by taking our advice here today, you’ll quickly become an expert at flaunting perfect cheekbones every time. So read on for all the ways you can use contouring to enhance your natural beauty.
Get a feminine, wider face with these cheek contour makeup tips
Cheek contour makeup can be a great way to get a more feminine, wider face shape that highlights your natural beauty. The following tips can help you achieve a flattering, well-defined look:
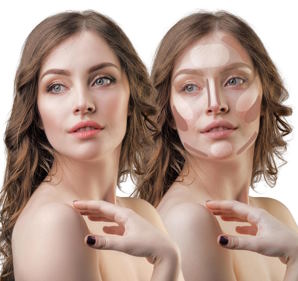 Begin with the right foundation shade and texture. Choose a foundation that matches your natural skin tone and use it to create an even base for your cheek contouring. If you have dry skin, opt for creamy foundations; if you have oily or combination skin, choose oil-free matte formulas.
- Pick the right blush color and placement. To give your face width and depth, use a blush in a peachy pink or light coral shade on the apples of your cheeks to create dimension as well as a natural glow.
- Use bronzer to contour and slim your face. For a slimming effect, use a matte bronzer one or two shades darker than your skin tone—it should be in the same family as your blush—and apply it along your upper temples, beneath the cheekbone, below the jawline and near the sides of your nose. These are the areas where shadows naturally fall on the face and will help create depth and definition for a more sculpted look.
- Highlight for an illuminated finish. To make sure that those contours get noticed, add some highlighter on top of them! Choose a creamy formula such as a liquid or cream-to-powder highlighter and apply it above the cheekbone, down the bridge of your nose and in the inner corner of your eyes for an illuminated finish.
These tips can help you get a beautiful, feminine face shape with just the right amount of contour! Try out this look and show off your stunning features!
Reveal your cheekbones with this step-by-step guide to contouring and highlighting
Contouring and highlighting can help you create the illusion of higher cheekbones, a feature that many people find attractive.
Start by applying your foundation or base makeup as usual. Then, to ensure you have an even canvas, use a damp beauty blender or brush to blend it out until your skin looks smooth and natural.

Now, grab a contour powder one shade darker than your natural skin tone. You want something matte, not shimmery—Look for words such as “matte” and “satin”. With a fluffy brush, sweep some product along the hollows of your cheeks and lightly blend it upwards toward the temple area. Ensure you don’t add too much product at once; you want it to look natural.
Next, grab your highlighting product. Unlike the contour powder, this should be a shade or two lighter than your skin tone, preferably with a shimmer finish. Again, sweeping a small amount along the top of your cheekbones will help them stand out without looking unnatural. You can also use an appropriate highlighter on the bridge of your nose and cupid’s bow for added definition.
Finally, blend everything with a damp beauty blender. Ensure all lines are blended until they’re almost invisible, leaving only subtle shadows and highlights behind! This will create the illusion of naturally enhanced cheekbones in just a few simple steps. Have fun experimenting with different products and techniques until you find something that works for you.